Image source from Parallels Desktop
Intro How To Install Windows on Mac
To install Windows on Mac in fact you’ve got a couple of options. One approach is to make use of the built-in Boot Camp Assistant application which is free to use. On the other hand, you can opt for virtualization software like Parallels Desktop, VMware Fusion or VirtualBox. These applications allow you to run Windows alongside macOS thus giving you flexibility.
Now, if you’re using newer Mac models equipped with processors like M1, M2 or the upcoming M3 as a result there is no more Boot Camp Assistant. For these Macs, Microsoft recommends using Parallels Desktop as the only solution to install Windows and run Arm versions of Windows 11 Pro and Windows 11 Enterprise nonetheless this information is provided on the Microsoft Windows 11 Support page.
Why Windows on Your Mac
Based on feedback from our clients, the primary reason is to utilize a specific accounting software that exclusively functions on the Windows platform. In these cases, having a Windows system becomes necessary.
However, if your intention is to use Microsoft Office applications such as Word, Excel and PowerPoint, it’s worth noting that macOS offers versions of Microsoft Word, Excel and PowerPoint as well with the same functions.
Difference between Boot Camp Assistant and Virtualization Software
Boot Camp Assistant is a free built-in application on every Intel-based macOS that allows users to install Windows on a separate partition on their Mac computer. By using boot camp it does not let you run Windows and macOS simultaneously so if you want to switch between Windows and Mac systems, you will need to restart to switch between both systems. Boot camp is the better option for playing games and using resource-intensive applications because it only runs one system at a time.
Virtualization Software is a third-party software, it is not free and requires purchasing a license. They allow you to run Windows and macOS simultaneously, which can be more convenient for some users. Do note running both systems together means it will demand more processor and RAM resources.
When you’re operating Windows through Virtualization Software, it’s important to ensure that you minimize the number of applications running on your macOS simultaneously. By doing this, you enable the Windows side to effectively utilize a greater share of processor and RAM resources. This optimization can significantly enhance the performance of your virtualized Windows environment.
How to check Intel-based processor or M processor?
Open the Apple menu: Click on the Apple menu on the top left corner of your desktop screen. Click on About This Mac -> About This Mac from the dropdown menu. Check the processor or chip information: Look for an item labelled “Processor” or “Chip” in the About This Mac window. If it says “Intel Core” or similar your Mac is Intel-based. If it says “Chip Apple M1” or similar, your Mac has an M processor.


Using Boot Camp Assistant to Install Windows on Mac
Simply follow the instructions provided below. Click through the steps by selecting “Next” at each stage and you’ll easily and smoothly complete your Windows installation. It’s important that when you are allocating partition space for Windows, you should take note that once the allocation is set, you won’t be able to modify it unless you delete Boot Camp and repeat the installation process.


For more info on Boot Camp Assistant, click here.
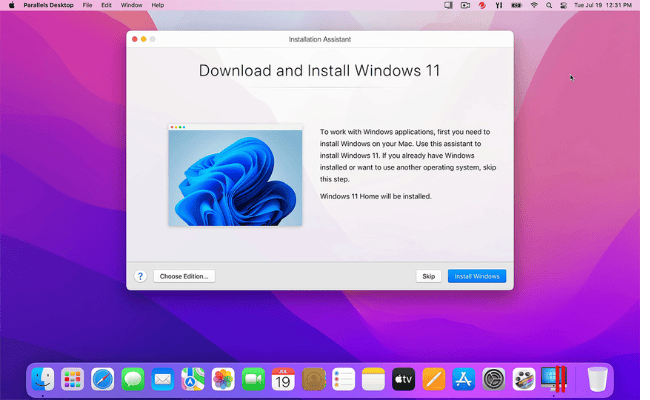
Using Parallels Desktop to Install Windows on Mac
To get started, simply head over to the official Parallels Desktop official page. Once you’ve purchased the license, proceed to follow the provided instructions for downloading the application. After this step, you can easily navigate through the straightforward installation instructions as shown here. In next to no time, you’ll have Windows up and running smoothly on your Mac.

Important Note
With Parallels Desktop 19, the default Windows 11 Pro version will be installed automatically. Currently, there isn’t an option to switch to the Home edition. This means that if you have a Windows 11 Home license key, it won’t function within Parallels Desktop 19 hence it only accepts Pro license keys.

Pro Tip
It is important to back up all your macOS files and data before engaging in any type of Windows installation. This step ensures that in the event of any issues or potential macOS crashes, your files and data remain safe and accessible. If you require guidance on macOS system reinstallation due to a crash, you can easily refer to this guide.
Contact us
As dedicated Mac users for over 15 years, we understand the frustration and helplessness that arise when your beloved Mac computer unexpectedly breaks down. But fear not! At YP Mac, we wholeheartedly focus on addressing and resolving precisely those distressing situations!
We offer hassle-free Mac repairs, as highlighted by our tagline: “Simplify Mac repairs with us.” Our commitment lies in providing convenient solutions for all your Mac-related needs.
Our skilled technicians streamline the repair process, ensuring quick and efficient service. Trust us for a seamless experience and join our satisfied customers today.
Contact us now for any inquiries you might have or visit us at ypmac.com.my
Facebook Group
Join our dynamic Facebook group dedicated to all things Apple Mac! Connect with fellow enthusiasts, discuss the latest trends and share your insights about the world of Mac technology. Don’t miss out—become a part of our community today!
